
Launch your blog
You’ve decided to start a blog. That’s the exciting part.
Now comes the part that trips up most beginners: actually launching it. Between choosing platforms, registering domains, installing themes, configuring settings, and everything else, the process can quickly feel like wandering through a maze without a map.
Most setup guides either oversimplify (“Just click install and you’re done!”) or overwhelm you with every possible option and technical detail you might encounter. Neither approach helps when you’re trying to launch your blog without spending weeks researching or second-guessing every decision.
This guide takes a different approach. We’ll walk through launching your blog in a logical sequence that keeps you moving forward without getting stuck in decision paralysis or technical rabbit holes. You’ll understand what actually matters for getting started versus what you can figure out later.
By the end, you’ll have a clear roadmap for taking your blog from idea to live website—without the confusion, overwhelm, or endless tutorials that leave you more lost than when you started.
Who This Guide Is For (And Who It’s Not For)
This guide is for you if:
- You’ve decided to start a blog but feel overwhelmed by the technical setup process
- You want clear, sequential steps without unnecessary technical jargon
- You have limited time and need to know what’s essential versus optional
- You want to launch quickly without making costly mistakes
This might not be for you if:
- You’re already comfortable with web hosting and WordPress installation
- You need advanced customization or complex technical configurations from day one
- You’re building something other than a standard content blog (like an e-commerce site)
Understanding the Three Phases of Blog Launch
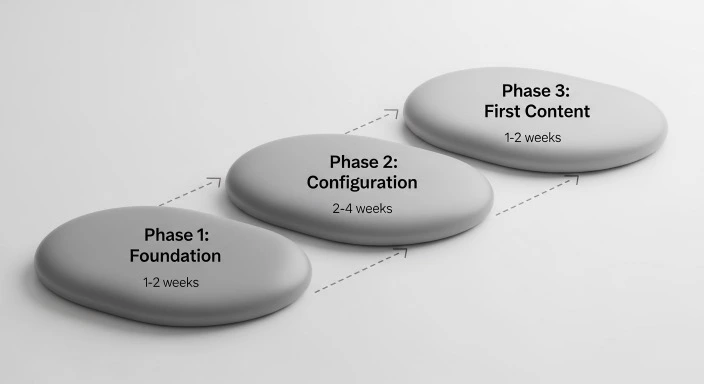
Before diving into specific steps, it helps to understand that launching a blog happens in three distinct phases. Knowing where you are in the process prevents that “lost in the weeds” feeling.
Phase 1: Foundation (2-3 hours)
This covers the technical basics that get your blog online: choosing hosting, registering your domain, and installing WordPress. These decisions are important but not as permanent or complicated as they seem.
Phase 2: Configuration (1-2 hours)
This includes choosing your theme, adjusting essential settings, and creating necessary pages. You’re making your blog look and function like an actual website rather than a default installation.
Phase 3: First Content (2-4 hours)
This is where you write your initial posts, set up basic SEO, and prepare to publish. Your blog transitions from “technically exists” to “ready for readers.”
Total realistic timeline: 5-9 hours spread across several days.
Most people get lost because they try to do everything simultaneously or skip around between phases. Following the sequence keeps you oriented.
Phase 1: Getting Your Blog Online
Choosing Your Hosting Provider
Your hosting provider is the company that stores your blog’s files and makes them accessible on the internet. This decision matters, but you’re not locked in forever—you can change hosts later if needed.
For busy beginners, we recommend starting with one of these three:
Bluehost offers the simplest beginner experience with one-click WordPress installation and 24/7 support. Plans start around $2.95 monthly and include a free domain name for your first year. The interface is designed for people who’ve never set up a website before.
SiteGround provides better performance and customer service at slightly higher cost (starting around $3.99 monthly). If you’re willing to invest a bit more for fewer technical headaches, this is the better choice.
DreamHost costs less (starting around $2.59 monthly) and offers a generous money-back guarantee. Good middle ground between affordability and reliability.
Which should you choose? If you’re a complete beginner prioritizing ease over everything else, go with Bluehost. If you want better performance from day one and don’t mind spending slightly more, choose SiteGround. All three work well for busy bloggers.
According to WPBeginner’s hosting research, the hosting provider matters less for new blogs than simply choosing a reputable option and moving forward. Your early traffic won’t stress any of these services.
Registering Your Domain Name
Your domain name is your blog’s address on the internet (like BloggingforBusyPeople.com). This feels like a huge decision, but in practice, your content matters infinitely more than your domain name.
Guidelines for choosing:
Make it easy to spell and pronounce. If people hear it once, they should be able to find it.
Keep it reasonably short. Longer domains are harder to remember and type.
Prefer .com if available, but .net or .blog work fine too. Most people default to typing .com, so it’s the safest choice.
Don’t obsess over having the “perfect” keyword-rich domain. SearchEngineJournal notes that exact-match domains no longer provide the SEO advantage they once did. Your domain should be memorable and professional, not stuffed with keywords.
The domain decision shouldn’t take more than 30 minutes. Brainstorm 5-10 options, check availability, and pick one that’s available as a .com. If your first choice is taken, modify it slightly rather than spending hours trying to find the “perfect” alternative.
Most hosting providers include free domain registration for the first year. During signup, you’ll enter your desired domain name, and the system will tell you immediately if it’s available.
Installing WordPress
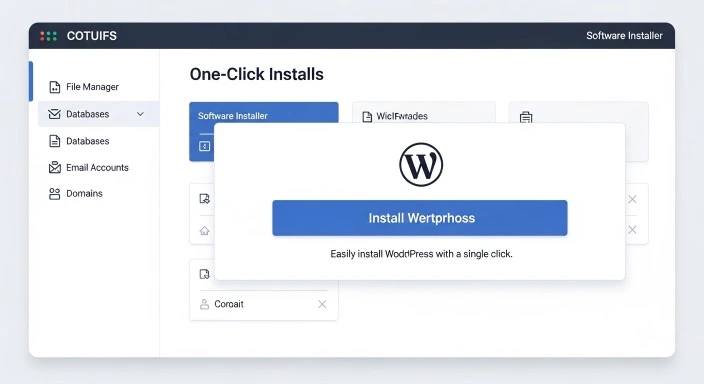
Once you’ve purchased hosting and registered your domain, you need to install WordPress—the software that powers your blog.
The good news: Every major hosting provider offers one-click WordPress installation. You won’t be editing code or configuring databases manually.
The typical process:
Log into your hosting account’s control panel (usually called cPanel or a custom dashboard).
Look for “WordPress” or “Website” in the main menu.
Click the one-click installation option (often labeled “Install WordPress” or “Quick Install”).
Enter basic information: your blog’s name, your admin username, and a strong password.
Click install and wait 2-3 minutes.
That’s it. WordPress is now installed on your domain.
Common confusion point: You’ll create an admin username and password during installation. Write these down immediately. You’ll need them to log into your blog’s dashboard later. This is separate from your hosting account login.
After installation, you can access your blog’s admin area by going to: yourdomain.com/wp-admin
This is where you’ll do everything else—writing posts, changing settings, installing themes, and managing your blog.
Accessing Your New Blog
Once WordPress is installed, visit your domain in a web browser. You should see a default WordPress site with a basic theme and placeholder content.
It won’t look like much yet, but this confirms everything is working. You have a functional blog. Everything from here is customization and content creation.
Visit yourdomain.com/wp-admin and log in with the username and password you created during installation. This takes you to your WordPress dashboard—the control center for your entire blog.
Spend a few minutes clicking through the dashboard menu. Don’t worry about understanding everything yet. Just get familiar with where things are located.
Phase 2: Configuring Your Blog
Choosing and Installing Your Theme
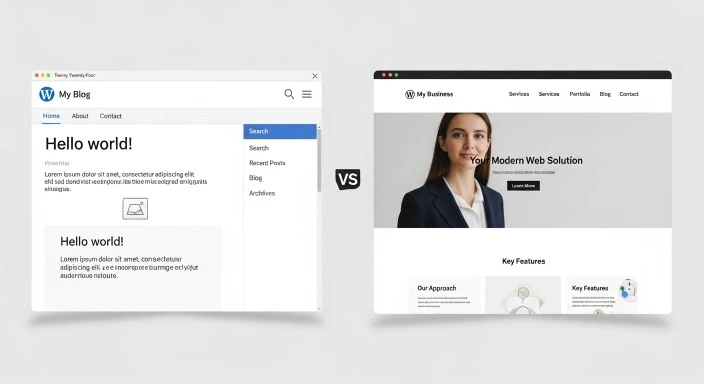
Your theme controls your blog’s visual design and layout. WordPress comes with a default theme, but you’ll likely want something different.
For beginners, start with a free, well-reviewed theme:
GeneratePress is clean, fast, and highly customizable without being overwhelming. The free version handles everything most new bloggers need.
Astra offers similar benefits with a slightly different design aesthetic. Also excellent for beginners.
Neve provides a modern look and works well on mobile devices without additional configuration.
How to install a theme:
From your WordPress dashboard, go to Appearance → Themes.
Click “Add New” at the top.
Search for the theme name (like “GeneratePress”).
Click “Install” on the theme you want.
Once installed, click “Activate.”
Your blog now uses this theme. You can preview themes before activating them by clicking “Preview” instead of “Activate.”
Don’t spend days comparing themes. Pick something clean and simple, use it for your first 20 posts, then decide if you want to change it. Your content matters more than having the perfect design from day one.
You can customize your theme’s colors, fonts, and layout by going to Appearance → Customize. This opens a visual editor where you can make changes and see them in real-time before saving.
Adjusting Essential Settings
Several WordPress settings need attention before you start publishing content.
Permalink structure (critical for SEO):
Go to Settings → Permalinks in your dashboard.
Select “Post name” rather than the default “Plain” option.
Click “Save Changes.”
This makes your URLs readable (yourblog.com/blog-post-title instead of yourblog.com/?p=123). This matters for both SEO and user experience, according to Yoast’s permalink guide.
General settings:
Go to Settings → General.
Confirm your site title and tagline accurately describe your blog.
Set your timezone.
Confirm your email address is correct (WordPress sends notifications here).
Reading settings:
Go to Settings → Reading.
Set how many blog posts appear on your homepage (7-10 is typical).
Decide whether search engines can index your site. Unless you have a specific reason to hide your blog, leave “Discourage search engines” unchecked.
Discussion settings:
Go to Settings → Discussion.
Decide whether to allow comments, and if so, whether they require approval before appearing.
Many bloggers start with comment moderation enabled to prevent spam.
These settings take about 15 minutes total. You can always adjust them later, but getting them right initially prevents problems.
Installing Essential Plugins
Plugins add functionality to WordPress. You don’t need many initially—too many plugins can slow your site down.
The essential starter plugins:
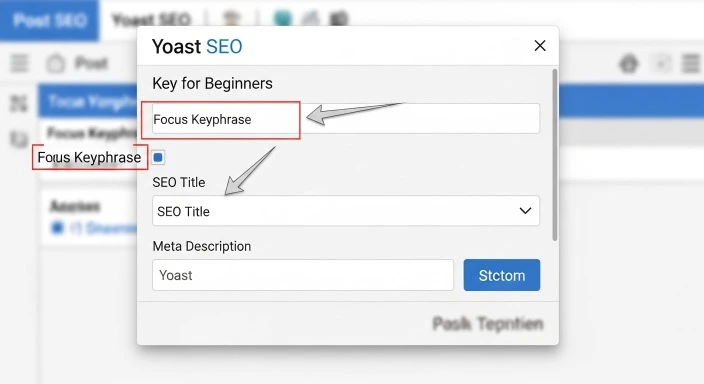
For SEO: Install either Rank Math or Yoast SEO (pick one, not both). These help optimize your posts for search engines without requiring technical SEO knowledge. Both offer free versions that cover everything beginners need.
For security and backups: Install UpdraftPlus to automatically back up your blog. The free version handles basic backups to cloud storage like Google Drive or Dropbox.
For spam protection: Install Akismet Anti-Spam (comes pre-installed with WordPress but needs activation). This prevents spam comments from overwhelming your blog.
How to install plugins:
From your dashboard, go to Plugins → Add New.
Search for the plugin name.
Click “Install Now” next to the correct plugin.
Once installed, click “Activate.”
Some plugins require additional configuration after activation. They’ll usually display a notice with instructions. Follow these to complete setup.
Avoid installing dozens of plugins immediately. Start with these essentials and add others only when you have a specific need they solve.
Creating Essential Pages
Every blog needs a few standard pages beyond blog posts.
About page:
Explains who you are and what your blog offers. This builds trust with new readers and helps them decide if your content is relevant to them.
Create this by going to Pages → Add New. Write 300-500 words about yourself, why you started the blog, and what readers can expect.
Contact page:
Lets readers reach you with questions or feedback.
Install a contact form plugin like WPForms (free version works fine). Create a new page, insert the contact form, and publish.
Privacy Policy:
Required if you collect any data (email addresses, comments, analytics). WordPress includes a privacy policy generator that creates a basic template you can customize.
Go to Settings → Privacy → Create New Page. WordPress generates a template based on plugins you’ve installed. Review it, customize as needed, and publish.
These pages typically belong in your site’s footer menu, making them accessible without cluttering your main navigation.
Phase 3: Preparing to Publish
Writing Your First Posts
Don’t publish just one post and call your blog “launched.” Aim to have 3-5 posts ready before you start promoting your blog. This gives visitors something to explore and makes your blog look established rather than brand new.
Your first posts should:
Answer specific questions your target audience has. Think about what confused you when you were learning about your topic.
Be helpful rather than perfect. Your first posts won’t be your best work, and that’s completely normal.
Demonstrate what your blog will cover. These posts set expectations for future content.
Each post should be 800-1,500 words minimum. Shorter posts can work, but search engines tend to favor more comprehensive content for most topics.
Where to find ideas for your first posts:
Look at popular blogs in your niche and note which of their posts have the most comments or shares.
Use AnswerThePublic.com to find questions people actually search for about your topic.
Think about the questions you had when you were a beginner in your niche.
Check forums, Facebook groups, or Reddit communities in your niche to see what people ask about repeatedly.
Don’t try to cover everything in your first posts. Each should focus on one specific question or problem.
Setting Up Basic SEO
SEO (search engine optimization) helps people find your blog through Google and other search engines. You don’t need to be an SEO expert to get started—just cover the basics.
If you installed Rank Math or Yoast SEO earlier, you’ll see an SEO section in each post editor.
For each post:
Choose one main keyword or phrase you want the post to rank for. This should be something people actually search for.
Include this keyword in your post title, first paragraph, and a few times throughout the post naturally.
Write a meta description (the summary that appears in search results). Make it 150-160 characters that accurately describes your post.
Use header tags (H2, H3) to organize your content. These help both readers and search engines understand your post structure.
Add alt text to images describing what they show. This helps with accessibility and image search.
Don’t obsess over getting a perfect SEO score. The plugins often suggest improvements that don’t significantly impact actual rankings. Focus on writing helpful content first, SEO optimization second.
Internal linking—linking from one of your posts to another—becomes important once you have 10+ posts published. For your first few posts, this isn’t possible yet.
Setting Up Google Analytics and Search Console
Before launching, set up tools to track your blog’s performance.
Google Analytics shows you how many people visit your blog, which posts they read, and how long they stay. It’s free and essential for understanding what’s working.
Google Search Console shows you how your blog appears in Google search results, which keywords bring you traffic, and any technical issues Google encounters.
Both tools are free and take about 15-20 minutes to set up.
For Analytics:
Create a Google Analytics account at analytics.google.com.
Add your blog as a property.
Follow the instructions to add the tracking code to your WordPress site (many plugins make this easy).
For Search Console:
Go to search.google.com/search-console.
Add your blog as a property.
Verify ownership (usually by adding a small file to your site or connecting through your Analytics account).
Submit your sitemap (usually yourblog.com/sitemap.xml if you’re using Rank Math or Yoast).
You won’t see much data immediately, but having these set up from the start gives you historical data as your blog grows.
Creating Your Menu Navigation
Your navigation menu helps readers explore your blog. Keep it simple initially.
Go to Appearance → Menus in your WordPress dashboard.
Create a new menu and name it something like “Main Menu.”
Add your key pages (Home, About, Contact) to the menu.
You can also add a “Blog” or “Articles” link that shows all your posts.
Arrange items in logical order (typically: Home, Blog, About, Contact).
Save the menu and assign it to your theme’s primary menu location.
Avoid creating elaborate multi-level menus initially. Simple navigation works better for new blogs with limited content.
What to Avoid When Launching Your Blog
Don’t Pursue Perfection Before Publishing
Many beginners spend months tweaking their theme, rewriting their About page, or researching the “perfect” plugins without publishing any actual content.
Your blog doesn’t need to be perfect to launch. It needs to be functional and helpful. Everything can be refined after you’ve published your first posts.
The sooner you start publishing, the sooner you start learning what resonates with readers.
Don’t Install Every Plugin That Sounds Useful
Plugin overload is a common beginner mistake. Each plugin adds complexity and potential security vulnerabilities.
Start minimal. Add plugins only when you have a specific problem they solve. If you’re not sure whether you need a plugin, you probably don’t yet.
Don’t Ignore Mobile Responsiveness
Over 60% of web traffic comes from mobile devices. Your blog must look good and function well on phones and tablets.
Most modern themes are mobile-responsive by default. Test this by visiting your blog on your phone before launching. If it’s difficult to read or navigate, choose a different theme.
Don’t Skip the Privacy Policy and Legal Pages
If you collect email addresses, use analytics, or display ads, you need a privacy policy. If you use affiliate links, you need to disclose that.
These aren’t optional nice-to-haves—they’re legal requirements in many jurisdictions. WordPress includes privacy policy templates that make this straightforward.
Don’t Launch Without Any Content
Publishing your blog with zero posts or just one introductory post makes it look abandoned. Have at least 3-5 solid posts ready before you start promoting your blog or sharing it publicly.
This gives new visitors something to explore and signals that your blog is active rather than a work-in-progress.
Frequently Asked Questions
How long does it really take to launch a blog from start to finish?
Plan for 6-10 total hours spread across several days. This includes choosing hosting (30 minutes), installing WordPress and choosing a theme (1-2 hours), configuring essential settings (1-2 hours), and writing your first 3-5 posts (4-6 hours depending on length and research needed). Trying to do everything in one sitting usually leads to decision fatigue and mistakes. Better to work in focused 2-3 hour sessions over a week.
Do I need to know how to code?
No. Modern WordPress blogging requires zero coding knowledge. Everything happens through visual interfaces and point-and-click editors. You might occasionally need to copy-paste small snippets from tutorials (like adding Google Analytics tracking), but this isn’t coding—it’s following instructions. If you can use Microsoft Word and send email, you have enough technical skills to launch a WordPress blog.
What if I choose the wrong hosting or theme and need to change later?
Both can be changed, though it requires some effort. Switching hosting providers involves migrating your blog (most new hosts offer free migration assistance). Changing themes is easier—you simply activate a new theme and reconfigure your customizations. Neither decision is permanent. Start with a solid, popular option and don’t overthink it. You can always change later if needed.
Should I launch my blog publicly or work on it privately first?
Launch publicly once you have 3-5 posts ready. Working privately for months while perfecting everything usually leads to never launching. There’s a “Discourage search engines” setting in WordPress you can enable while building your first posts, then disable when ready. This keeps your blog technically accessible but hidden from search results. However, most new blogs get zero traffic initially anyway, so this privacy step is often unnecessary.
Do I need an email list from day one?
Not immediately, but set it up within your first month. Email list building becomes easier once you have some traffic and content. Start by adding a simple signup form to your sidebar or post footers using a free email service like MailerLite or ConvertKit’s free tier. You don’t need elaborate welcome sequences or lead magnets initially—just a way for interested readers to subscribe and get notified when you publish new posts.
Final Thoughts
Launching your blog doesn’t require months of preparation or advanced technical knowledge. It requires following a logical sequence of steps without getting distracted by every possible option or optimization.
You’ve now seen the complete path from choosing hosting to publishing your first posts. The process is straightforward when you know what actually matters versus what you can handle later.
Most beginners get lost because they try to learn everything simultaneously or pursue perfection before publishing. Your goal isn’t to build the perfect blog immediately—it’s to get a functional blog online so you can start creating content and serving readers.
The real work of blogging happens after launch, when you’re consistently publishing helpful content and refining your approach based on what resonates with your audience. Everything you’ve set up here creates the foundation for that work.
Give yourself permission to launch with “good enough” rather than waiting for “perfect.” Your blog will evolve significantly over your first year. The decisions you’re making now—hosting, theme, initial settings—are less permanent and less crucial than they feel in the moment.
Start with the essentials outlined in this guide. Launch once you have several solid posts ready. Then focus your energy on the work that actually builds successful blogs: creating helpful content consistently and showing up for your readers over time.
The technical setup is just the beginning. The real journey starts when you publish your first post and begin building something valuable for your audience.
You also will like to read : Blogging Efficiently When You Have Minimal Free Time
Our Authority Sources
This article draws on research and guidance from established authorities in WordPress, blogging, and web hosting:
WPBeginner – The largest free WordPress resource site, offering comprehensive hosting comparisons, setup tutorials, and plugin recommendations based on extensive testing and millions of users’ experiences.
Yoast – Leading SEO plugin developer whose research and documentation on WordPress optimization, permalink structure, and search engine best practices is widely trusted in the blogging industry.
SearchEngineJournal – Authority publication on SEO and digital marketing, providing data-driven insights about domain names, search rankings, and content optimization strategies.